-
[AWS] AWS IoT Greengrass V2 Workshop 2클라우드/AWS 2023. 12. 5. 23:15
1에서는 component의 로컬 배포를 만드는 과정이었고,
이제는 component의 특정 버전에 만족하면 현장에서 디바이스에 배포할 구성 요소를 준비하는 과정에 대한 실습 -> 즉 클라우드에 배포하는 실습임!!
AWS Cloud에서 component를 배포하려면 먼저 recipe 파일을 확장해 S3의 component artifact를 참조한 다음 component artifact를 S3로 업로드 해야한다.
배포가 구성되면 디바이스가 S3에서 아티팩트를 다운로드 한다.
즉,
1. recipe 파일 확장(s3의 artifact를 참조하는 방법으로 지정)
2. component artifact를 s3로 업로드
3. 배포 구성 완료 후 디바이스가 s3에서 아티팩트를 다운로드 하게 함
S3 버킷 생성하기

레시피 파일에서 s3버킷으로 참조하는걸로 변경하자 ,, 아래 파일들은 여러 컴포넌트의 레시피 파일들이다. 버전 관리도 할 수 있음!

{
   "RecipeFormatVersion": "2020-01-25",
   "ComponentName": "com.example.HelloWorld",
   "ComponentVersion": "1.0.0",
   "ComponentDescription": "My first AWS IoT Greengrass component.",
   "ComponentPublisher": "Amazon",
   "ComponentConfiguration": {
      "DefaultConfiguration": {
         "Message": "world"
      }
   },
"Manifests": [
      {
         "Platform": {
            "os": "linux"
         },
         "Lifecycle": {
            "Run": "python3 -u {artifacts:path}/hello_world.py '{configuration:/Message}'\n"
         },
         "Artifacts": [
            {
               "URI": "s3://여기에 버킷이름 적기/artifacts/com.example.HelloWorld/1.0.0/hello_world.py"
            }
         ]
      }
   ]
}
- s3로 아티팩트를 업로드 하자
aws s3 cp --recursive /home/ubuntu/environment/GreengrassCore/ s3://$S3_BUCKET/
IoT Greengrass의 component에서 component 정의를 생성하자
cd /home/ubuntu/environment/GreengrassCore/recipes && aws greengrassv2 create-component-version  --inline-recipe fileb://cohttp://m.example.HelloWorld-1.0.0.json --region $AWS_DEFAULT_REGION

# component 목록 확인
aws greengrassv2 list-components --region $AWS_DEFAULT_REGION
새로운 구성 요소들을 만들자
pub/sub IPC
- v2는 프로세스 간 통신을 위한 IPC SDK를 제공함
- 컴포넌트의 각 프로세스 간 pub/sub 통신이 가능하a
-> 센서 데이터를 읽고 토픽에 계속 pub하는 component, 해당 토픽 로그를 sub하고 메시지를 수신하는 component 및 ipc를 사용하는 컴포넌트를 만드는 과정
publisher
더미 센서 만들기
# dummy_sensor.py
from random import gauss

class DummySensor(object):
    def __init__(self, mean=25, variance=1):
        self.mu = mean
        self.sigma = variance

    def read_value(self):
        return float("%.2f" % (gauss(1000, 20)))

if __name__ == '__main__':
    sensor = DummySensor()
    print(sensor.read_value())


# example_publisher.py
import time
import datetime
import json
import awsiot.greengrasscoreipc
from awsiot.greengrasscoreipc.model import (
    PublishToTopicRequest,
    PublishMessage,
    JsonMessage
)
from dummy_sensor import DummySensor


TIMEOUT = 10
publish_rate = 1.0

ipc_client = awsiot.greengrasscoreipc.connect()

sensor = DummySensor()

topic = "my/topic"


while True:
    message = {"timestamp": str(datetime.datetime.now()),
               "value": sensor.read_value()}
    message_json = json.dumps(message).encode('utf-8')

    request = PublishToTopicRequest()
    request.topic = topic
    publish_message = PublishMessage()
    publish_message.json_message = JsonMessage()
    publish_message.json_message.message = message
    request.publish_message = publish_message
    operation = ipc_client.new_publish_to_topic()
    operation.activate(request)
    future = operation.get_response()
    future.result(TIMEOUT)

    print("publish")
    time.sleep(1/publish_rate)
publisher를 위한 component 레시피 생성
{
  "RecipeFormatVersion": "2020-01-25",
  "ComponentName": "com.example.Publisher",
  "ComponentVersion": "1.0.0",
  "ComponentDescription": "A component that publishes messages.",
  "ComponentPublisher": "Amazon",
  "ComponentConfiguration": {
    "DefaultConfiguration": {
      "accessControl": {
        "aws.greengrass.ipc.pubsub": {
          "com.example.Publisher:pubsub:1": {
            "policyDescription": "Allows access to publish to all topics.",
            "operations": [
              "aws.greengrass#PublishToTopic"
            ],
            "resources": [
              "*"
            ]
          }
        }
      }
    }
  },
  "Manifests": [
    {
      "Lifecycle": {
        "Install": "pip3 install awsiotsdk numpy",
        "Run": "python3 -u {artifacts:path}/example_publisher.py"
      }
    }
  ]
}
component 배포
sudo /greengrass/v2/bin/greengrass-cli deployment create \
  --recipeDir ~/environment/GreengrassCore/recipes \
  --artifactDir ~/environment/GreengrassCore/artifacts \
  --merge "com.example.Publisher=1.0.0"
Subscriber
-> 위에랑 비슷함
# 아티팩트 폴더, 빈 스크립트 파일 생성
mkdir -p ~/environment/GreengrassCore/artifacts/com.example.Subscriber/1.0.0 && cd ~/environment/GreengrassCore/artifacts/com.example.Subscriber/1.0.0
touch example_subscriber.py

# Copyright Amazon.com, Inc. or its affiliates. All Rights Reserved.
# SPDX-License-Identifier: MIT-0
import time
import json
import awsiot.greengrasscoreipc
import awsiot.greengrasscoreipc.client as client
from awsiot.greengrasscoreipc.model import (
    SubscribeToTopicRequest,
    SubscriptionResponseMessage
)

TIMEOUT = 10

ipc_client = awsiot.greengrasscoreipc.connect()


class StreamHandler(client.SubscribeToTopicStreamHandler):
    def __init__(self):
        super().__init__()

    def on_stream_event(self, event: SubscriptionResponseMessage) -> None:
        message_string = event.json_message.message
        with open('/tmp/Greengrass_Subscriber.log', 'a') as f:
            print(message_string, file=f)

    def on_stream_error(self, error: Exception) -> bool:
        return True

    def on_stream_closed(self) -> None:
        pass


topic = "my/topic"

request = SubscribeToTopicRequest()
request.topic = topic
handler = StreamHandler()
operation = ipc_client.new_subscribe_to_topic(handler)
future = operation.activate(request)
while True:
    time.sleep(1)

operation.close()

# 레시피 폴더와 빈파일 생성
touch ~/environment/GreengrassCore/recipes/com.example.Subscriber-1.0.0.json

{
  "RecipeFormatVersion": "2020-01-25",
  "ComponentName": "com.example.Subscriber",
  "ComponentVersion": "1.0.0",
  "ComponentDescription": "A component that subscribes to messages.",
  "ComponentPublisher": "Amazon",
  "ComponentConfiguration": {
    "DefaultConfiguration": {
      "accessControl": {
        "aws.greengrass.ipc.pubsub": {
          "com.example.Subscriber:pubsub:1": {
            "policyDescription": "Allows access to publish to all topics.",
            "operations": [
              "aws.greengrass#SubscribeToTopic"
            ],
            "resources": [
              "*"
            ]
          }
        }
      }
    }
  },
  "Manifests": [
    {
      "Lifecycle": {
        "Install": "pip3 install awsiotsdk",
        "Run": "python3 -u {artifacts:path}/example_subscriber.py"
      }
    }
  ]
}

# 구성요소 배포
sudo /greengrass/v2/bin/greengrass-cli deployment create \
  --recipeDir ~/environment/GreengrassCore/recipes \
  --artifactDir ~/environment/GreengrassCore/artifacts \
  --merge "com.example.Subscriber=1.0.0"
tail -f /tmp/Greengrass_Subscriber.log 가 실행되면, 실시간으로 센서 데이터를 받고있는 구독자의 로그이다.

Local MQTT Broker
여기까지는 Greengrass 디바이스가 데이터 공급자 역할을 할 수 있도록 허용하는 로컬 Pub/Sub 개념이였다.
그러나 데이터 공급자가 Greengrass 장치 외부에 있는 경우 MQTT 형식으로 게시 대상을 도입할 수 있다.
(Greengrass 장치를 로컬 MQTT 게이트웨이로 바꾸는 브릿지)

배포 -> 구성요소 들어가서 mqtt 구성을 추가하자

각 구성요소에 아래 코드를 넣어주자
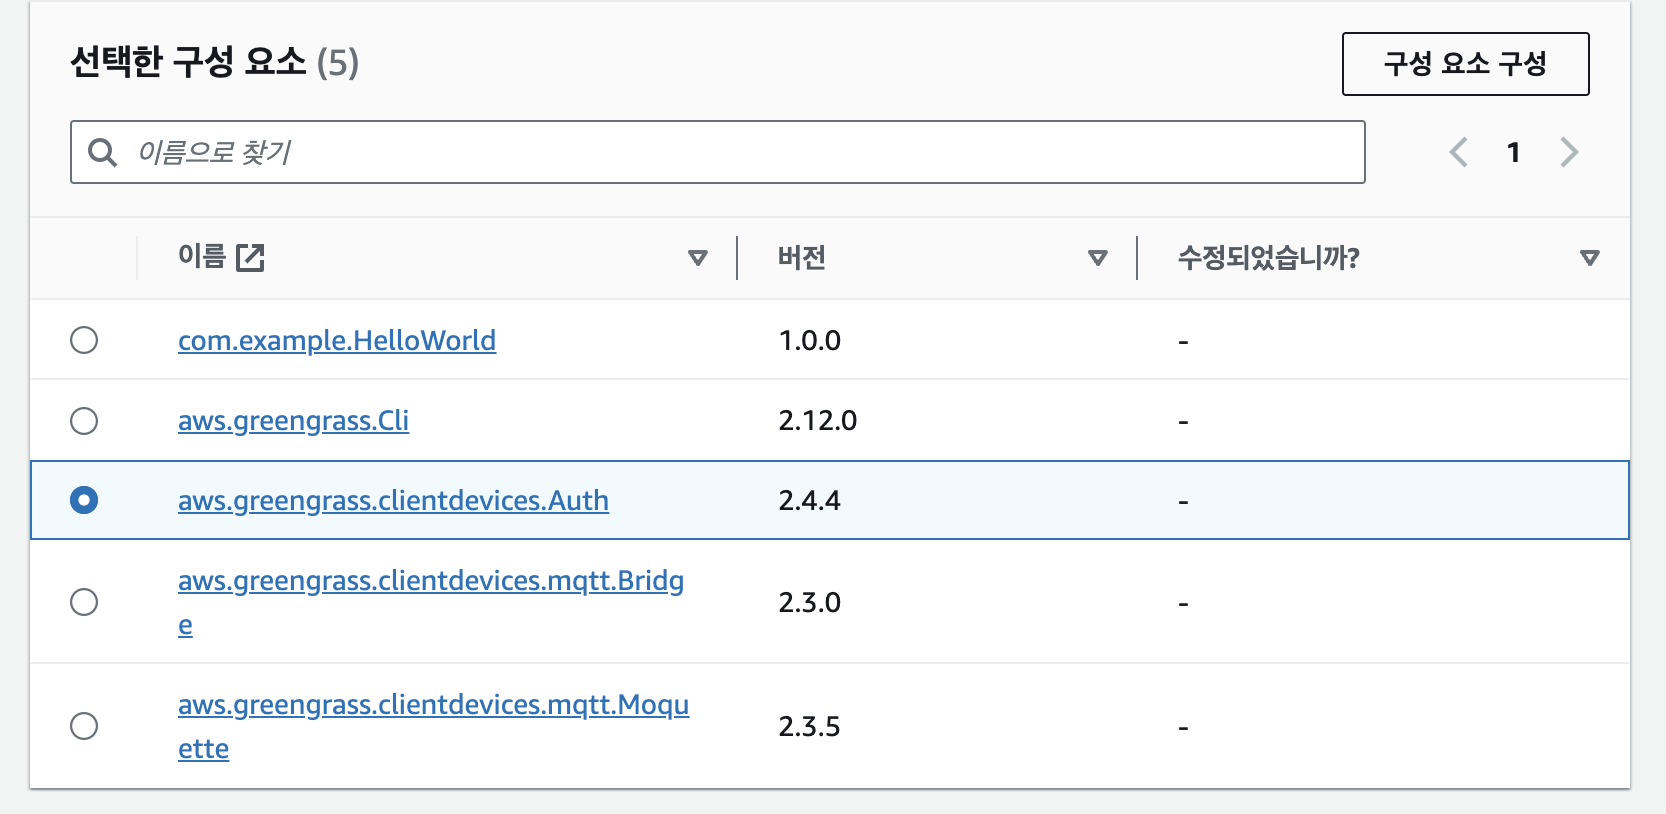
# Auth
{
  "deviceGroups": {
    "formatVersion": "2021-03-05",
    "definitions": {
      "MyDeviceGroup": {
        "selectionRule": "thingName: MyClientDevice* OR thingName: MyOtherClientDevice*",
        "policyName": "MyClientDevicePolicy"
      }
    },
    "policies": {
      "MyClientDevicePolicy": {
        "AllowAll": {
          "statementDescription": "Allow client devices.",
          "operations": [
            "mqtt:connect",
            "mqtt:publish",
            "mqtt:subscribe"
          ],
          "resources": [
            "*"
          ]
        }
      }
    }
  }
}

# Bridge
{
   "mqttTopicMapping": {
     "HelloWorldIotCoreMapping": {
       "topic": "clients/+/hello/world",
       "source": "LocalMqtt",
       "target": "IotCore"
     }
   }
 }
- Mosquitto 클라이언트를 사용해 장치를 시뮬레이션
- 인증 구성 요소는 AWS IoT Core에서 AWS IoT 사물로 등록되고 사물과 연결된 동일한 인증서를 제공하는 디바이스를 지원
- Auth component 구성을 보면 이름이 MyClientDevice 로 시작하는 장치를 허용하고 있다.
- cloud9 에 아래의 내용을 입력하자 두가지 장치임...
cd ~/environment
mkdir -p devices
cd devices
THING_NAME=MyClientDevice1
aws iot create-thing --thing-name $THING_NAME
CERTIFICATE_ARN=$(aws iot create-keys-and-certificate --private-key-out $THING_NAME.key --certificate-pem-out $THING_NAME.crt --query "certificateArn" --out text --set-as-active)
aws iot attach-thing-principal --thing-name $THING_NAME --principal $CERTIFICATE_ARN

cd ~/environment
mkdir -p devices
cd devices
THING_NAME=MyOtherClientDevice1
aws iot create-thing --thing-name $THING_NAME
CERTIFICATE_ARN=$(aws iot create-keys-and-certificate --private-key-out $THING_NAME.key --certificate-pem-out $THING_NAME.crt --query "certificateArn" --out text --set-as-active)
aws iot attach-thing-principal --thing-name $THING_NAME --principal $CERTIFICATE_ARN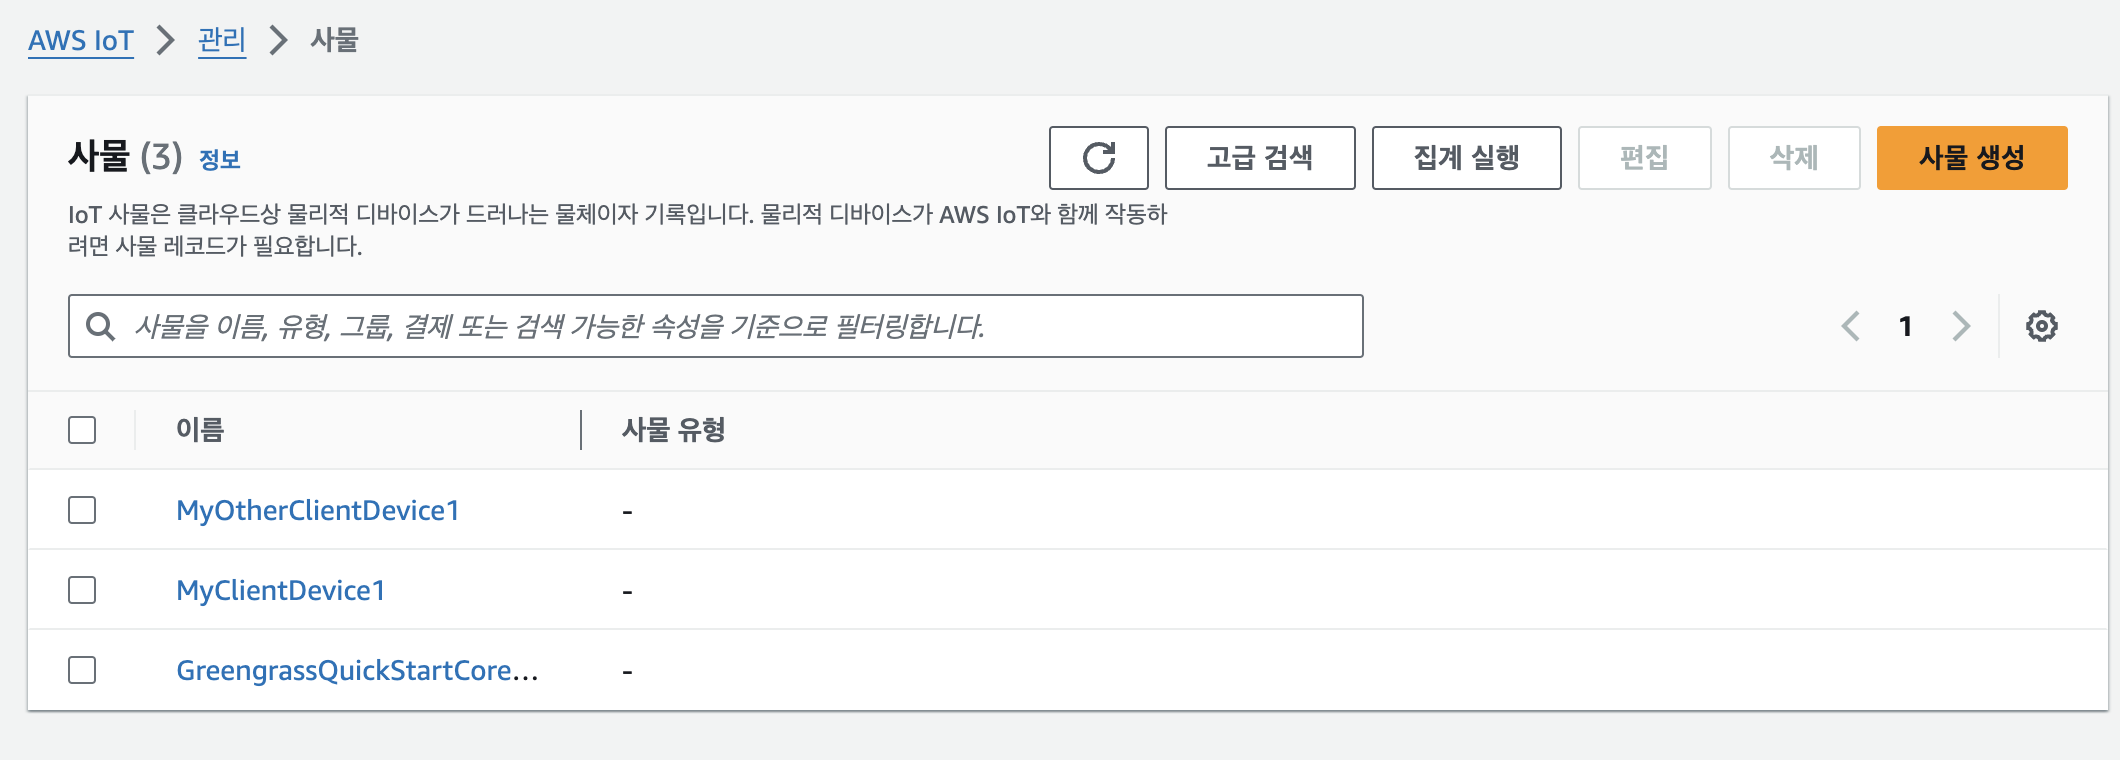
MQTT를 통한 기기 통신 테스트
- mosquitto 클라이언트 설치하고, 클라이언트 설치한 곳에서 subscribe 진행
구독하는 터미널

게시하는 터미널

브로커가 로컬로 작동하고 있음을 확인할 수 있다.
https://realyun99.tistory.com/193?category=862463
[AWS] AWS IoT Greengrass V2 실습 -2
더보기 위의 실습을 이어서 진행할 것이다. https://realyun99.tistory.com/192 AWS Cloud에서 component를 배포하려면 먼저 recipe 파일을 확장해 S3의 component artifact를 참조한 다음 component artifact를 S3로 업로드
realyun99.tistory.com
'클라우드 > AWS' 카테고리의 다른 글
[ALB] ALB에 EC2 연결하면서 만난 문제들 (0) 2024.10.20 [RDS] MySQL 5.7 to 8.0 업그레이드 기록 (2) 2024.07.27 [AWS] IoT Greengrass V2 Workshop 1 (2) 2023.12.05 [AWS] MGN를 이용하여 마이그레이션 (1) 2023.12.04 [AWS] Terraform으로 쿠버네티스 배포하기 (0) 2023.08.14